Special finishes course – Photoshop Bitmap files
Bitmap files
- Unless you are doing a halftone or mixed ink Pantone, Photoshop special finishes should be created as bitmap tifs.
- Bitmaps should be saved as .tif or .psd files.
- The recommended effective resolution for a bitmap is 1200ppi and the minimum effective resolution is 900ppi.
- Bitmap .tif files can be coloured and tinted in InDesign via the Swatches panel (Window>Colour>Swatches).
- They do not contain any tonal variation.
- They must be set to overprint via the Attributes panel in InDesign (Window>Output>Attributes).
- Do not alter their opacity as this can cause issues which may not be visible on screen. It should always be set to 100% opacity.
- They can be coloured within InDesign. So one file could be used for multiple finishes.
- They can be used to create 1% masks.
Creating a Bitmap from a colour or grayscale file
Always increase the resolution of a file to 1200dpi before converting it to Bitmap. A common mistake is to set the resolution to 1200dpi in the bitmap image mode window. This produces a bitmap that is technically 1200dpi but is actually the quality of 300dpi file. Please see the list below for a step by step guide and/or view the video below:
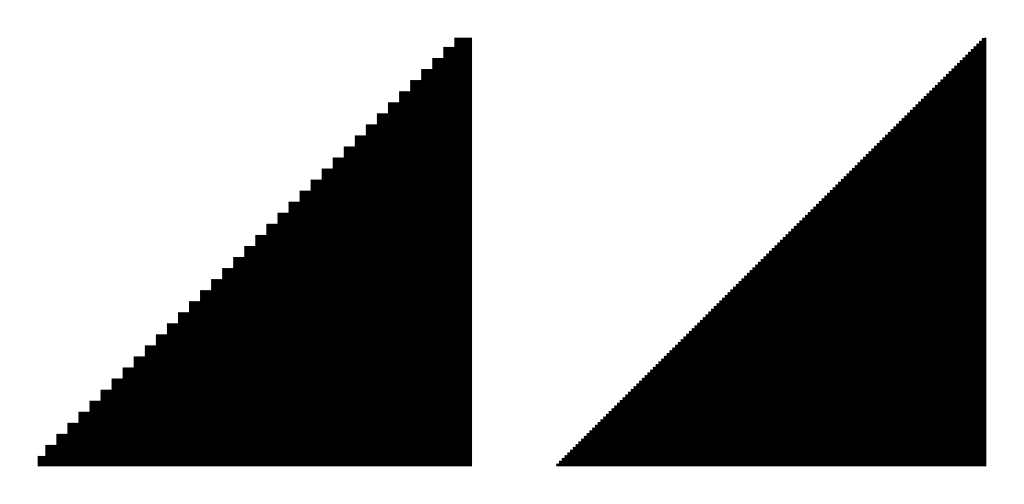
Here is an enlarged view of 2 bitmaps. Both are 1200dpi but the one on the right has 4 times the detail.
- Make a selection of the area you want using an existing layer mask or any of the selection tools (Marquee tools, Lasso tools, Quick Selection tool, Magic Wand tool or Pen tool).
- Create a new solid fill colour layer and colour it black. Go to the Layers panel (Windows>Layers) and click on the Create new fill or adjustment layer icon (the circular icon at the bottom of the Layers palette), select solid colour and select a black colour.
- Increase the resolution to 1200dpi (Image>Image Size…). Make sure that you have Resample Image checked and set to Bicubic Automatic before you change the resolution to 1200 pixels/Inch. This will increase the resolution without increasing the document size (physical size).
- Check that the black filled area is solid (doesn’t have any gradients of feathering). If not, apply a levels adjustment to the layer mask of your black colour fill layer to make it solid throughout (Image>Adjustments>Levels).
- Turn off all the other layers via the Layers panel.
- Flatten the layers. Go to the Layers panel (Windows>Layers) and select Flatten Image via the fly-out menu. Discard hidden layers if prompted.
- Convert it to Grayscale (Image>Mode>Grayscale). Discard the colour information if prompted.
- Convert it to Bitmap (Image>Mode>Bitmap). Set the Output to 1200 pixels/inch and the method to 50% Threshold.
Click here to navigate back to the Contents page.


